In todays hectic lifestyle, multicookers stand as beacons of convenience, promising perfectly cooked grains at the touch of a button.
We’ve all been there: staring at a bag of rice, wondering how to transform it into a fluffy, flavorful masterpiece. That’s where these seven essential multicooker settings come into play. They’re the secret ingredients to grain perfection, each one a key that reveals new culinary possibilities. From the precise timing of the rice setting to the versatile multigrain function, we’re about to explore how these features can elevate your everyday meals. But there’s more to this story than just pushing buttons…
Rice Setting

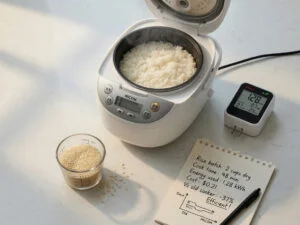
In the world of multicookers, the rice setting is our trusty companion for achieving perfectly cooked grains. We’ve all experienced the frustration of unevenly cooked rice, but with this specialized setting, we can bid farewell to those worries. Our multicooker’s rice function is designed to deliver the ideal texture and consistency every time we prepare our favorite grain. By utilizing fuzzy logic technology, this setting not only optimizes cooking times and water levels, but also caters to different rice types, securing that each grain cooks to perfection Micom rice cooker benefits.
The rice setting takes the guesswork out of cooking by utilizing preset time and pressure levels optimized for various rice types. We no longer need to worry about adding the right amount of water or setting the perfect cooking time. This clever feature guarantees our rice is cooked evenly, preventing both undercooked and overcooked results. It’s like having a rice expert right in our kitchen!
While the rice setting simplifies our cooking process, we can still make adjustments based on our preferences or the specific type of rice we’re using. Whether we’re cooking jasmine, basmati, or brown rice, we can depend on this setting to deliver consistent results. Let’s embrace the convenience and precision of our multicooker’s rice setting for perfectly cooked grains every time.
Multigrain Function
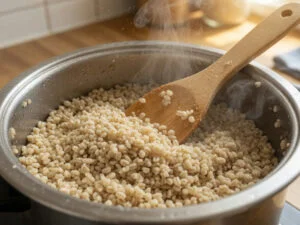
Culinary adventurers, rejoice! The Instant Pot‘s multigrain function is about to revolutionize our grain game. We’re talking specialized cooking programs for a variety of grains, from black rice to steel-cut oats, farro to polenta. This function offers us the flexibility to customize settings for each grain, ensuring best results every time. Additionally, just like cooking spaghetti in a rice cooker, this function allows for even heat distribution, which is key to achieving the perfect texture. Cooking spaghetti in a rice cooker can also be a time-saving method that retains more nutrients compared to traditional boiling methods.
Let’s explore why the multigrain function is a game-changer for us grain enthusiasts:
- Set-it-and-forget-it convenience
- Dishwasher-safe components for easy cleanup
- Ability to experiment with diverse grains
We’re no longer limited to just white rice. With the multigrain function, we can expand our horizons and try new textures and flavors. Imagine perfectly cooked black rice with just the right bite, or creamy steel-cut oats without the constant stirring. The Instant Pot’s multigrain function takes the guesswork out of cooking these sometimes tricky grains.
We’re part of a community that appreciates both convenience and culinary exploration. The multigrain function caters to our gadget-savvy nature while allowing us to dive deep into the world of grains. It’s time to embrace this feature and let our grain creativity flourish!
Pressure Level Adjustment

Let’s explore how pressure levels impact our grain cooking in multicookers. Understanding the differences in cooking mechanisms can help us adjust our settings for the finest results. We’ll compare low and high pressure settings, identifying ideal configurations for various grains. Rice cookers guarantee flawlessly cooked rice while pressure cookers manage a variety of recipes, allowing for customization in texture and taste. We’ll also learn how to adapt these settings to achieve our desired textures, whether we’re aiming for perfectly fluffy rice or chewier whole grains.
Low vs. High Pressure
Many multicookers offer the option to adjust pressure levels, typically between low and high settings. As pressure cooker enthusiasts, it is common knowledge that understanding these settings is essential for achieving the perfect texture in our grains. High pressure is our preferred choice for most grains, as it cooks food faster and breaks down tough textures. However, low pressure has its place in our culinary toolkit, particularly for delicate grains like quinoa.
Let’s explore the key differences:
- High pressure: Ideal for faster cooking times and breaking down tough grains
- Low pressure: More gentle on delicate grains, aiding in preserving their shape
- Adjustable settings: Enable us to switch between high and low pressure for versatile cooking options
Optimal Settings for Grains
With a keen eye on pressure levels, we can access the full potential of our multicookers for perfect grain preparation. As fellow grain enthusiasts, being aware that high pressure is our go-to setting for most grains, ensuring consistent and delicious results. When cooking a cup of rice or heartier grains like barley, we’ll want to stick with high pressure to achieve that perfect texture we all crave.
However, let’s not forget our more delicate grains. For quinoa or millet, we might want to dial it back a notch and use a lower pressure setting. This prevents overcooking and helps maintain the integrity of these smaller grains. As we experiment with different pressure levels, we’ll discover the sweet spot for each grain type, revealing new flavors and textures in our culinary adventures.
Adjusting for Texture Preferences
As we immerse ourselves in the world of texture customization, adjusting pressure levels on our multicookers becomes a game-changer for achieving grain perfection. We’ve discovered that pressure plays a pivotal role in determining the final texture of our grains. Higher pressure yields softer grains, while lower pressure maintains a firmer bite. This knowledge empowers us to tailor our cooking process to our specific preferences and recipe requirements.
Let’s explore how we can adjust pressure for different grain textures:
- High pressure: Ideal for creamy risottos and soft, pillowy rice
- Medium pressure: Perfect for balanced textures in everyday rice dishes
- Low pressure: Great for maintaining chewiness in wild rice and heartier grains
Cooking Time Customization
When it comes to cooking grains in our multicookers, we’ll need to adjust our timing based on the specific type we’re preparing. We can rely on preset functions for common grains like rice or quinoa, but for more specialized varieties, we’ll want to use the manual setting to fine-tune our cooking times. Let’s explore how experimenting with different release methods—quick, natural, or a combination—can also impact the final texture of our grains.
Adjusting for Grain Type
Three key elements determine the ideal grain cooking duration in your multicooker: the type of grain, its water-to-grain proportion, and your desired texture. Let’s delve into how we can adjust our multicooker settings for different grain varieties to achieve culinary excellence.
When it comes to preparing grains, a one-size-fits-all approach doesn’t work. Brown rice requires 12-15 minutes, quinoa needs 20-25 minutes, and wild rice calls for 25-30 minutes. We’ll have to adapt our multicooker settings accordingly. Remember, the water-to-grain proportion is essential:
- White rice: 1:1.25
- Brown rice: 1:2
- Quinoa: 1:2.5
By comprehending these ratios, we can guarantee our grains come out just right. For whole grains like barley, we’ll need to set longer cooking durations, while white rice requires less time. Don’t hesitate to experiment with manual adjustments to personalize your cooking durations. It’s all about discovering what works best for our preferred recipes.
As devoted multicooker fans, we’re always striving to enhance our grain preparation skills. By mastering these modifications, we’ll be presenting flawlessly cooked grains consistently, impressing our fellow food enthusiasts with our multicooker expertise.
Preset vs. Manual Timing
Diving into the world of multicooker settings, we’ll explore the essential distinction between preset and manual timing options for grain perfection. As rice enthusiasts, we recognize the importance of achieving that ideal texture and doneness in every batch.
While preset settings offer convenience, they may not always align with our specific preferences or grain types. That’s where manual timing comes in handy. We can adjust cooking time manually to experiment with different results, customizing our multicooker experience for best grain satisfaction.
Let’s compare preset and manual timing options:
| Feature | Preset Timing | Manual Timing |
|---|---|---|
| Convenience | High | Moderate |
| Customization | Limited | Extensive |
| Learning Curve | Low | Moderate |
| Consistency | High | Variable |
Experimenting With Release Methods
Building on our understanding of preset and manual timing options, we’ll now turn our attention to another key factor in achieving perfect grains: release methods. As fellow rice enthusiasts, as experts, the way we release pressure can greatly impact our final dish.
Let’s explore the two main release methods:
- Natural release: This gentle method typically takes under 10 minutes and allows the rice to finish cooking in residual heat.
- Quick release: A faster option that can result in a different texture, depending on the rice variety.
- Combination approach: Some cookers emit a sound when releasing pressure, signaling the end of cooking.
We’ve found that experimenting with these methods can help us tailor our rice texture to our individual preferences. It’s worth noting that cooking time remains consistent even when doubling the quantity, so we can confidently adjust our portions without concern.
For those of us who enjoy tinkering with our multicookers, trying different release methods is an excellent way to fine-tune our results. Whether we prefer fluffy, separate grains or a slightly stickier texture, mastering these techniques will elevate our rice game and impress our fellow grain aficionados.
Keep Warm Mode

After the cooking process is complete, your multicooker’s Keep Warm mode becomes an essential feature for maintaining perfectly cooked grains. This ingenious setting guarantees our grains stay at the ideal serving temperature, preventing them from getting cold or drying out. We’ve all experienced the disappointment of perfectly cooked rice turning into a dry, unappetizing mess while we finish preparing other dishes. With Keep Warm mode, we can bid farewell to that culinary frustration.
Let’s delve into the benefits of this game-changing feature. By activating Keep Warm mode, we’re able to preserve the flavor and texture of our grains until we’re ready to serve. This is particularly useful when we’re juggling multiple dishes or waiting for guests to arrive. We can rest easy knowing our rice, quinoa, or other grains will be just as delicious as when they first finished cooking. As fellow gadget enthusiasts, we appreciate how this setting allows us to time our meals perfectly, guaranteeing every component is ready to enjoy simultaneously. By embracing Keep Warm mode, we’re elevating our grain game and joining the ranks of savvy home cooks who always serve impeccable rice.
Sauté and Simmer Features
In addition to Keep Warm mode, our multicooker’s Sauté and Simmer features take grain preparation to new heights. We can now brown ingredients at high heat before pressure cooking, enhancing the flavor profile of our grain dishes. The Sauté function allows us to:
- Develop rich, complex flavors
- Create a flavorful base for our grains
- Reduce liquid in the pot for concentrated taste
After pressure cooking, we can switch to Simmer mode, gently cooking our grains to perfection. This feature helps us infuse flavors and achieve the ideal texture, whether we’re preparing rice, quinoa, or other grains. By utilizing these functions effectively, we’re elevating our culinary game and expanding our multicooker’s versatility.
Let’s embrace these features to create restaurant-quality grain dishes at home. With Sauté, we can toast our rice before adding liquid to the pot, revealing nutty flavors. Then, using Simmer, we can fine-tune the consistency of our risotto or pilaf. These settings allow us to experiment with various cooking techniques, bringing out the best in every cup of grain we prepare. Together, we’re mastering the art of grain cookery with our trusty multicooker.
Delay Start Option

The Delay Start option revolutionizes our grain cooking experience, allowing us to program our multicooker up to 24 hours in advance. We can now prepare our favorite grains with precision and convenience, tailoring our meal prep to our busy schedules. Whether we’re craving perfectly cooked rice for dinner or want our oatmeal ready when we wake up, this feature has us covered.
Imagine setting up our multicooker before bed, knowing that we’ll wake up to a steaming bowl of steel-cut oats. Or picture coming home to fluffy jasmine rice, ready to pair with our favorite stir-fry. The Delay Start option makes these scenarios a reality, obviating the need for constant monitoring and freeing up our time for other tasks.
We can now streamline our meal planning by using the Delay Start feature for various grains. From quinoa to barley, we’ll always have our chosen grain cooked to perfection at the exact moment we need it. This gadget-savvy approach to cooking guarantees we’re always prepared, fostering a sense of belonging among fellow multicooker enthusiasts who value efficiency and precision in their culinary endeavors.
Conclusion
We’ve cracked the secrets of perfect grains with these seven essential multicooker settings. But what if there’s more? As we experiment with pressure levels and release methods, we’re on the verge of grain nirvana. Will the next batch of jasmine rice be our best yet? Only time will tell. With our fingertips dancing across digital displays, we’re ready to elevate our grain game. The journey to the ultimate rice bowl continues, one precisely timed cycle at a time.