
Like Lazarus rising from the dead, we’ve brought countless rice cookers back to life when their owners thought they were done for. You know, it’s actually pretty frustrating when your trusty kitchen companion suddenly refuses to power up – especially when you’re craving that perfect bowl of rice. Well, before you toss it in the trash or start browsing for replacements, we’re going to show you exactly how to diagnose and fix the most common culprits that leave these appliances lifeless.
Common Causes When Your Rice Cooker Won’t Start
When your rice cooker suddenly stops working, it’s honestly pretty frustrating—especially when you’re craving that perfect bowl of rice. Well, there are actually several culprits behind this annoying problem. First, check if you’ve got power reaching the outlet—sometimes it’s that simple. The thermal fuse might’ve blown, which you can test with a multimeter for continuity. Maybe the inner pot isn’t seated properly, or debris is blocking the start button. Your power cord could be damaged too. Additionally, ensure that the inner pot is clean and free from residue, as this can also prevent proper functioning. These issues are like puzzle pieces—we’ll need to check each one systematically.
Essential Tools and Safety Precautions for Rice Cooker Repair
Before we start taking apart your rice cooker, let’s talk about getting the right tools together and—well, more importantly—keeping ourselves safe in the process. You’ll need a multimeter to check electrical components, screwdrivers for opening the casing, and needle nose pliers for small parts.
Safety first: always unplug your rice cooker before beginning any work. I can’t stress this enough—electrical shock isn’t worth the risk. Use your multimeter to inspect the thermal fuse and other components for continuity. Check your model’s manual for specific part requirements, and please don’t bypass safety features with makeshift solutions.
Testing the Thermal Fuse With a Multimeter

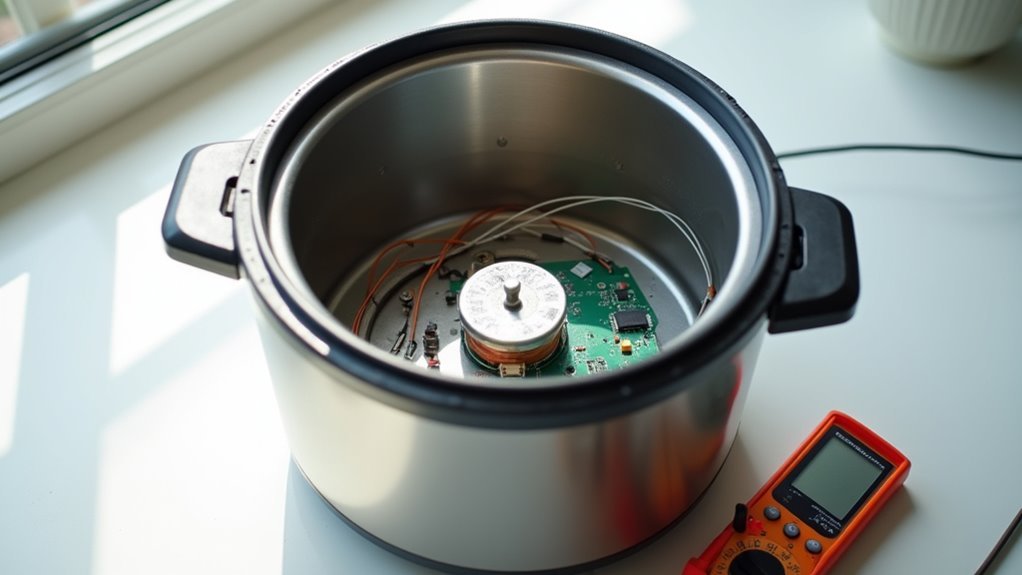
The thermal fuse is probably the most common culprit when your rice cooker suddenly stops working—think of it as the appliance’s circuit breaker that’s designed to sacrifice itself to protect you from potential fires. We’ll need a multimeter to test this component, which you’ll typically find hidden inside a white casing.
| Step | Action |
|---|---|
| 1 | Unplug rice cooker completely |
| 2 | Locate thermal fuse (white casing) |
| 3 | Set multimeter to continuity mode |
| 4 | Touch probes to fuse terminals |
| 5 | Check reading (zero means blown) |
Actually, testing’s pretty straightforward once you’ve got everything set up properly.
Locating and Accessing Internal Components
Now that we’ve tested the thermal fuse, we need to actually get inside the rice cooker to access the components that might be causing the problem. Don’t worry—it’s not as intimidating as it sounds, but we’ll need to carefully remove some screws that manufacturers often hide under labels or those little rubber feet on the bottom. Once we’ve got the bottom cover off, we can finally see what we’re working with and start identifying the heating element, thermostat, and other parts that keep your rice cooker running.
Opening the Rice Cooker
Since we’ve already gone through the basic troubleshooting steps and still can’t get our rice cooker working, it’s time to take a closer look at what’s happening inside. First things first—unplug that thing completely. Safety’s our priority here. Now, let’s open it up using a screwdriver to remove those bottom cover screws. Set them aside carefully; you’ll need ’em later. Check for sneaky hidden screws under labels or rubber feet too. Once we’ve got access, we can inspect the thermal fuse, heating element, and wiring. Handle everything gently—these components are more delicate than they look.
Finding Hidden Screws
Hidden screws are like ninjas—they’re masters of disguise and love to hide in plain sight. When we inspect our rice cooker, we’ll need to channel our inner detective. Look carefully under those rubber feet on the bottom—manufacturers love tucking hidden screws there. Labels and plastic covers are prime hiding spots too, so don’t skip them.
We recommend using a small flashlight to illuminate tight corners where screws might be lurking. Keep a screwdriver with interchangeable heads handy since you’ll probably encounter Phillips or maybe even Torx screws. Trust me, finding these sneaky fasteners requires patience.
Removing Bottom Cover
After we’ve tracked down all those sneaky screws, it’s time to actually remove the bottom cover and get our hands dirty with the real troubleshooting. Now comes the slightly nerve-wracking part—actually lifting that cover off without breaking anything. We’ll want to go slow here, maybe wiggling it gently if it feels stuck. Think of it like opening a stubborn jar; patience beats force every time. Once we’re removing bottom cover successfully, we can finally inspect those internal components that’ve been hiding from us. It’s actually pretty satisfying to see all the mysterious inner workings revealed.
Replacing a Faulty Thermal Fuse Step-by-Step
When you’ve confirmed that your thermal fuse is the culprit behind your rice cooker‘s refusal to turn on, replacing it isn’t as intimidating as it might seem—though I’ll admit, opening up any appliance can feel a bit nerve-wracking at first.
With your rice cooker unplugged and bottom cover removed, you’ll see the thermal fuse connected by two wires. Here’s what we need to do:
- Test the fuse with a multimeter for continuity—zero reading means it’s blown
- Carefully disconnect the old thermal fuse, noting wire positions
- Purchase an exact replacement matching specifications (195°C, 250V typically)
- Install new fuse, reassemble, and test operation
Troubleshooting Other Electrical Components
While the thermal fuse is often the main suspect behind a rice cooker that won’t turn on, it’s not the only electrical component that can fail—and honestly, I’ve seen plenty of cases where people replace the fuse only to discover the real problem was lurking elsewhere.
| Component | Testing Method |
|---|---|
| Power cord | Check for visible damage or fraying |
| Internal wiring | Inspect for loose connections, burnt spots |
| Start button switch | Examine for debris or mechanical issues |
| Thermostat | Verify proper heating cycle function |
Each component works like links in a chain—one weak link breaks everything.
Reassembling and Testing Your Repaired Rice Cooker
Once you’ve identified and replaced the faulty component—whether it’s that pesky thermal fuse or something else entirely—we’re looking at what’s honestly the most satisfying part of the whole repair process: putting everything back together and finding out if we actually fixed the thing.
Here’s how we’ll reassemble and test our rice cooker:
- Secure all screws and align each part properly during reassembly
- Double-check that electrical connections are firm and wire insulation is intact
- Inspect for visible damage before plugging back in
- Test with water, selecting cook mode to verify proper heating and mode switching
- After reassembly, it’s crucial to check components for signs of damage to ensure everything functions well.
Frequently Asked Questions
Why Does My Rice Cooker Won’t Turn On?
Coincidentally, we’ve encountered this exact problem! Your rice cooker likely has common issues like a faulty thermal fuse, damaged power cord, or stuck switch. We’ll share troubleshooting tips to identify and fix these problems effectively.
What Is the Average Lifespan of a Rice Cooker?
We’ve found rice cookers typically last 5-10 years. Higher-quality models exceed 10 years with proper rice cooker maintenance. We recommend following basic cooking tips and regular cleaning to maximize your appliance’s lifespan considerably.
Where Is the Fuse on a Rice Cooker?
Like a heart hidden within a chest, we’ll find the fuse location inside your rice cooker’s white casing near the heating element. The rice cooker circuitry conceals this essential component, requiring careful disassembly to access.
How to Clean the Heating Element in a Rice Cooker?
We’ll clean the heating element using gentle cleaning techniques. First, unplug and cool the cooker completely. Then we’ll wipe the heating element surface with a soft, damp cloth to remove residue safely.